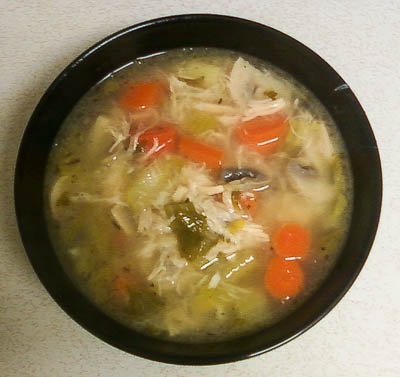
It’s a snow day! Yay for snow! And what is better on a cold, snowy day than a big bowl of homemade chicken soup (and maybe a little hot chocolate too).
So, as promised this morning on the Domestic Soul Facebook Page, I’ve put together some instructions for the chicken soup newbie. It’s really not complicated at all, and while the entire process took about 12 hours, I only had to do “work” (chopping, stirring, etc) for less than an hour – and that included taking pictures. So don’t panic, it’s really not nearly as much work as that 12 hours makes it sound. Also, I’m assuming you are starting completely from scratch. If you already have stock pot bone broth or crock pot bone broth, you can cut your cooking time down to maybe an hour or hour and a half – just pour the broth in the pot and start at step 3.
Also – don’t miss the Scarborough Fair Chicken Soup Recipe for another version!
How to Make Chicken Soup (just like Grandma!)
Step 1: Start with
- One whole chicken, organs removed, use the neck
- One medium to large onion, quartered
- About 2 tablespoons of white vinegar
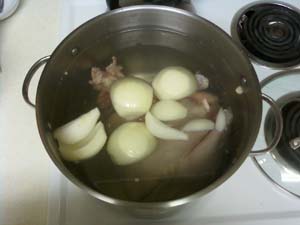
Toss everything into a stock pot and fill with water. My stock pot is 16qt, but anything around that size will be fine. Luckily, chicken soup isn’t an exact science. As I mentioned in my bone broth in a stock pot post, I use the rivets on the inside of my pot as a fill line. If you have a spot like that on your pot, use it as your fill line as well. It will help you know how much water you need to add back later.
Cover the pot and turn on high. Once it starts to boil, turn down to medium, maybe medium-low. You want it simmering, but not a crazy, rapid boil. Cover, but leave the lid slightly askew to vent. Go make yourself some coffee, turn on a movie, relax and let the soup do its thing.
Somewhere around the 2-3 hour mark, take a large fork or serving spoon (something you can stick in the boiling pot and reach the chicken without burning the heck out of yourself – no injuries please!) and break apart the chicken as much as you can. It doesn’t have to be perfect by any means, but you want the chicken to be in separate pieces instead of one whole bird. Then, see if you need to add back any water to make it back to your fill line. Then go have another cup of coffee and watch another movie… checking the soup periodically to see if you need to add back any water.
Step 2:
Somewhere around the 10-11 hour mark, the liquid in your stock pot should no longer be see through. At this point, you want to strain your soup – twice. First, put a large colander in a very large bowl and pour the entire contents of the pot into the bowl, straining it through the colander. I use a large colander with larger holes for this first strain. The goal here is to capture the large chunks of chicken and large bones without clogging the colander. Take the colander full of the large pieces and set aside. Then, take a smaller strainer and place over the stock pot and pour the broth back into the stock pot through the strainer to catch the smaller bones. It should look like this after the second strain:
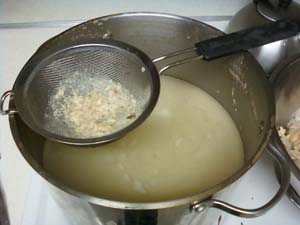
Keep that broth heating on the stove over medium/medium-low (whichever you had it set at before). Then, dump the contents of the first strainer into the large bowl and leave to the side to cool. It should look like this:

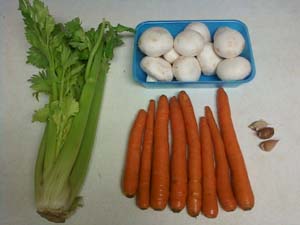
- One bunch of celery (minus 3 ribs I used earlier for chicken salad), chopped, including leaves
- 16oz white mushrooms, sliced
- 1lb carrots, chopped
- 3 cloves garlic, crushed and chopped
Be creative. I’ve always thought of chicken soup as a “clean out the fridge” kind of soup. Have some leftover kale? Toss it in. Spinach? Toss it in. See what you have hanging out in the veggie drawer and experiment.
Before I go on, here’s a little something I’ve picked up along the way when it comes to chopping celery:

If you have a large piece of celery that you want to chop into smaller pieces, one of the easiest ways to go about this is to do one long slice along the length of the stalk starting right below the top joint of the celery. If you start the slice below the joint, the celery still stays together as one piece when you hold it to chop, but now when you chop across the celery, you will have two perfectly sized pieces for every chop you make.
Anyway, after you chop all the veggies, add them to the broth in the pot. You should now have this:

Step 4:
Take the bowl of chicken pieces from the first strain of step two and sort it. To start this, I stand with the pot to my left, the bowl of chicken pieces in front of me, and an empty bowl to the right of me that I use as the discard pile. You want to dig through the bowl of chicken pieces, separate out all of the useable chicken pieces and add them to the stock pot. Any bones, skin and anything inedible should go in the discard bowl. In the process, you want to sort of squeeze the chicken pieces feeling for any sharp or hard pieces, making sure to remove those before adding the useable chicken to the pot. The reason you need to feel the chicken pieces so carefully is this:
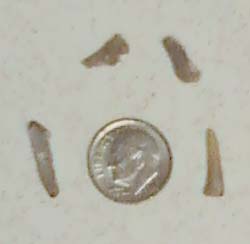 |
| Chicken bones next to a dime for size comparison. |
Chicken bones are freaking tiny and they can bury themselves in what looks like useable meat. You don’t want anyone to choke of course, so when you separate the chicken pieces, those tiny bones are what you are feeling for. Obviously, don’t add these to the pot, and instead toss them into the discard bowl.
After your sort, you should be left with this:
 |
| Soup: The Good (left) and The Bad (Right) |
Step 5:
Add your spices. I used a large pinch of thyme, a large pinch of sage, plus salt and pepper to taste. Cover, with lid askew to vent, and cook for 30-45 minutes more. Stir up, ladle into a bowl and serve!
Step 6:
Go EAT!
Enjoy!